MODULE 2 - VIEWS-ALL
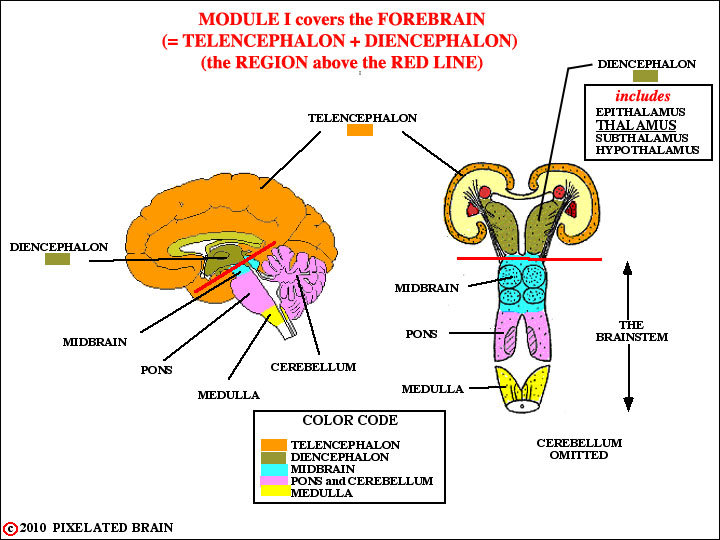
FIGURE 2-1
Module 1 covers the anatomy of the Forebrain. Thus, as shown here, this module focuses on zone above the red line, which includes the Diencephalon and the Telencephalon (= cerebral hemisphere).
Module 2 covers the anatomy of the Brainstem and Spinal Cord.
While this seems like a very tidy division, the situation is, in fact, more complex. The Diencephalon does indeed have a close developmental and functional relationship with the telencephalon. But it is also the "gateway" to the hemisphere, in that almost all ascending sensory pathways pass through the Diencephalon to reach the cerebral cortex. So it is inevitable that we will often think of it as being the rostral end of the brainstem, and most of the discussion of it will be found in Module 2. The thalamus is by far the largest subdivision of the Diencephalon and we may at times (incorrectly) use the two terms interchangeably.
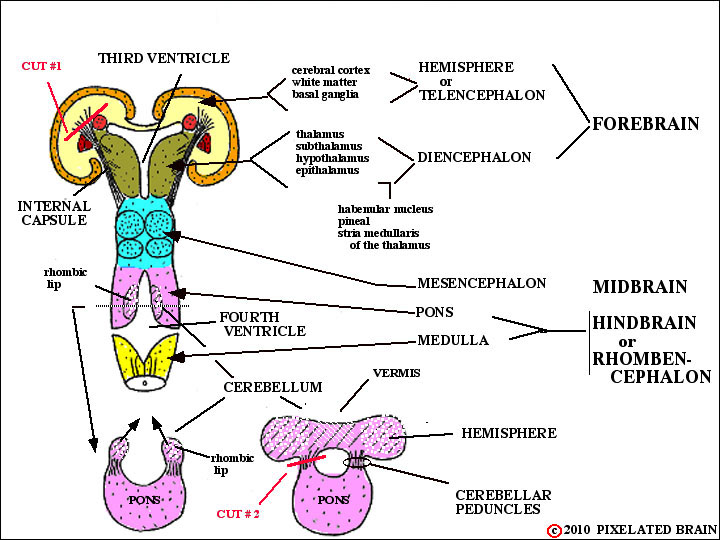
FIGURE 2-2
The various names applied to each part of the brain are given in this view.
You are already familiar with the way in which the cerebral hemisphere develops by evaginating outward from the side wall of the diencephalon. The cerebellum, in contrast, develops as a proliferation of the cells in the edge of the neural fold (the so-called rhombic lip, because it forms a margin of the rhomboid - shaped fourth ventricle) at the pontine level. The cell masses on either side join in the midline to become the cerebellum. Unlike the cerebral hemisphere, the cerebellum has a midline component (the vermis) as well as two lateral extensions, the cerebellar hemispheres. Both the cerebral hemisphere and the cerebellum are "anchored" to the brainstem by massive bundles of fibers (axons) which are, in fact, the input and output pathways of these structures. In the case of the cerebral hemisphere, this fiber bundle is the internal capsule, which you have already studied. The cerebellum has 3 separate fiber bundles of this sort, known as the cerebellar peduncles.
In any attempt to look at the dorsal and lateral surfaces of the brainstem, the first problem to be confronted is that this region is hidden below the cerebral hemispheres and cerebellum. You will recall that the expanding cerebral hemisphere extends caudally to completely cover the diencephalon and midbrain . How can we expose the brainstem to view? The obvious answer is to dissect away the tissue of the cerebral hemisphere (and of the cerebellar hemisphere, as well) which gets in the way. The most "pure" approach , at least in conceptual terms, would be to cut the relevant fiber bundles and then just lift off the hemispheres (cerebral and cerebellar). A careful look at this figure shows where to make the cuts. After making cut #1 (and this is pretty schematic) you would be able to lift off the cerebral hemisphere, leaving behind the basal ganglia, the diencephalon and the brainstem. After making cut #2 you would be able to lift off the cerebellum. The result would be to give you a good exposure of the dorsal surface of the brainstem (plus the basal ganglia and diencephalon). In fact, this is exactly what we propose to do.
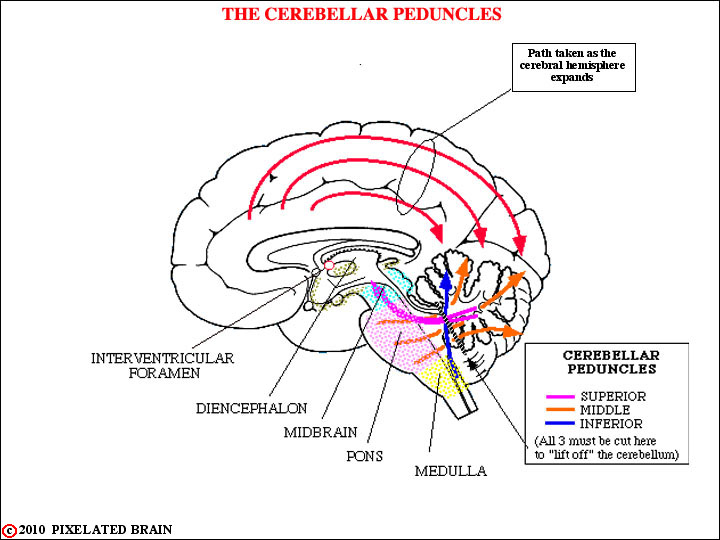
FIGURE 2-3
This view shows 1) how the expansion of the cerebral hemisphere has covered the brainstem (and cerebellum) and 2) how the cerebellum is anchored to the brainstem by the three cerebellar peduncles. Look carefully and you will see where the cut must be made to lift off the cerebellum.
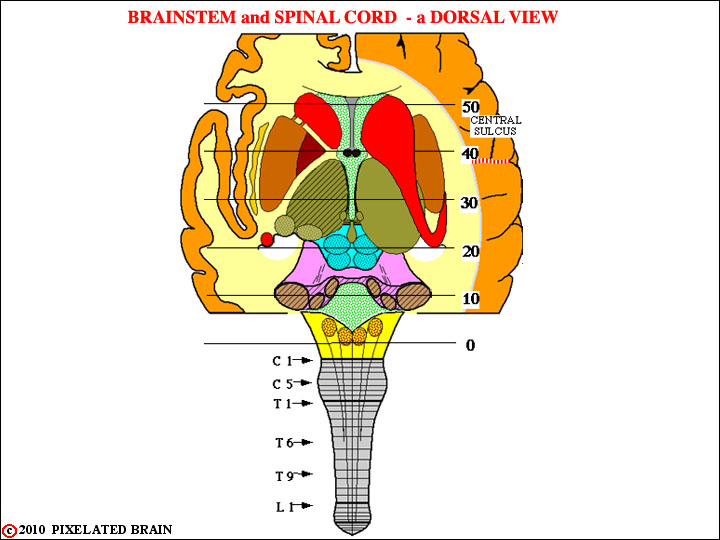
FIGURE 2-4
This is the view you get after the peduncles have been cut (cuts #1 and #2 in Figure 2-2) and the cerebral and cerebellar hemispheres have been lifted off to expose the brainstem. As the course progresses, we will draw in many pathways on this view.
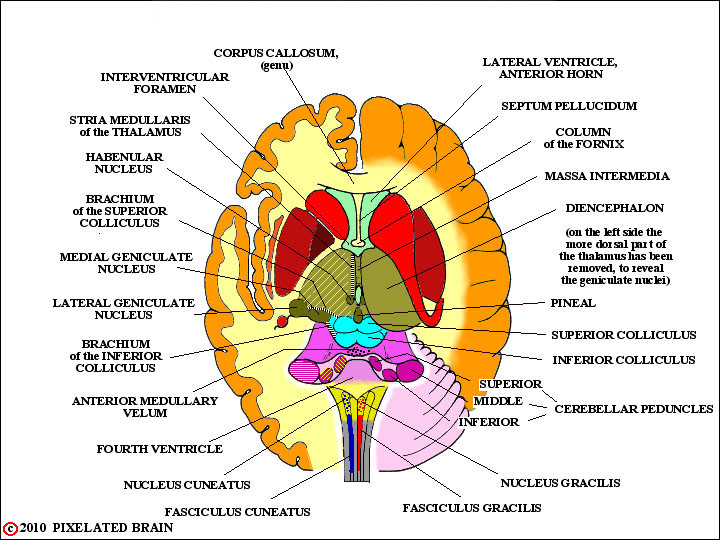
FIGURE 2-5
This is a similar view, in which the spinal cord has been cut off, and a great many labels added. See Figure 2.1 for the color code.
You are about to be confronted with the names for a great many structures, without being told much about the function of these structures. For the moment we have two goals: 1) we want you to begin to relate a name to a structure, so that when we do take up functional issues you will at least have an idea of where the structures are in the brainstem and 2) we want you to begin making the transition from surface view of the brainstem to cross sections through the same region.
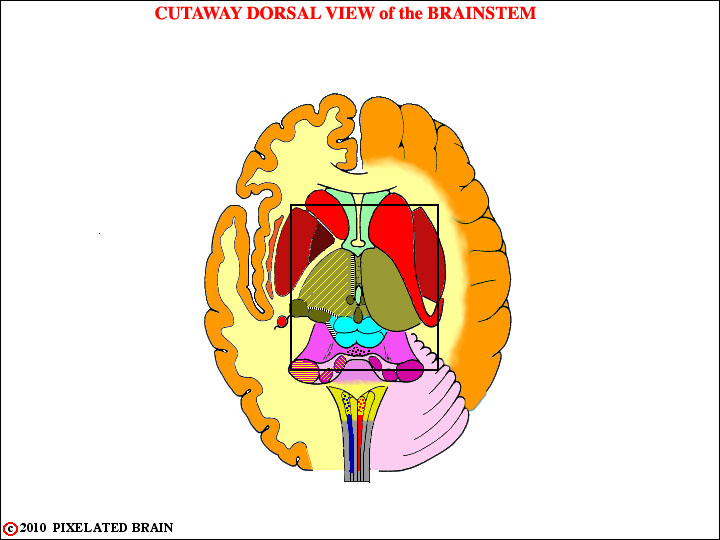
FIGURE 2-6
This is a similar view, in which the spinal cord has been cut off, and a great many labels added. See Figure 2.1 for the color code.
You are about to be confronted with the names for a great many structures, without being told much about the function of these structures. For the moment we have two goals: 1) we want you to begin to relate a name to a structure, so that when we do take up functional issues you will at least have an idea of where the structures are in the brainstem and 2) we want you to begin making the transition from surface view of the brainstem to cross sections through the same region.
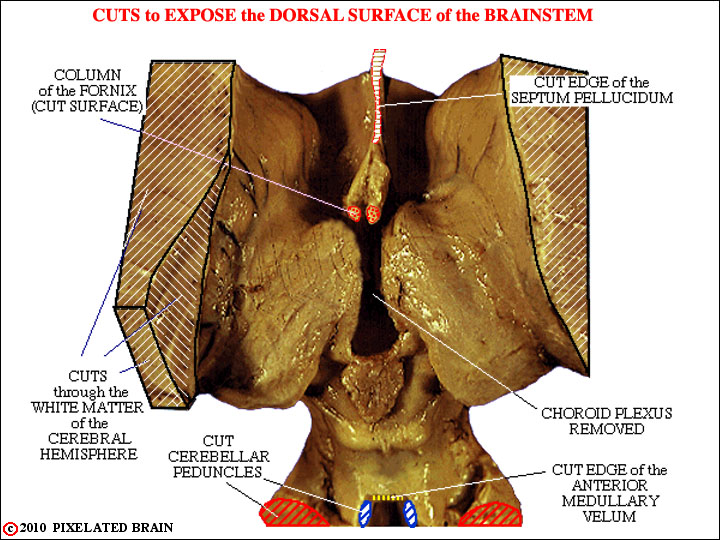
FIGURE 2-7
This view shows how the first dissection was carried out (i.e., where the cuts were made).

FIGURE 2-8
This view labels parts of the ventricular system (the body of the lateral ventricle has been left out, so that we can see the structures that form some of its borders) and the subdivisions of the caudate nucleus.
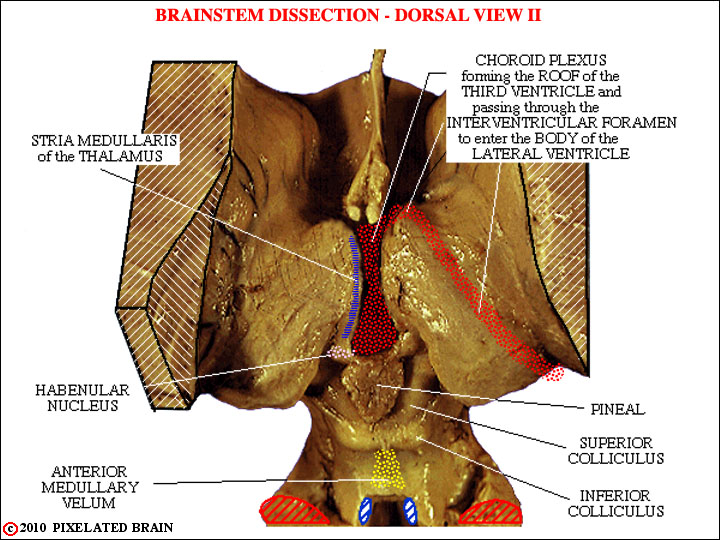
FIGURE 2-9
This view shows the course of the choroid plexus and identifies other structures. Switch back and forth between these copies and be certain you can identify the following:
1) the septum pellucidum: This thin membrane runs between the corpus callosum and the fornix and separates the anterior horns of the two ventricles from each other
2) the caudate nucleus
3) the stria medullaris of the thalamus. This is a longitudinal bundle of axons which also marks the point of attachment of the choroid plexus that normally roofs the third ventricle (but is removed in this dissection)
4) the habenular nucleus.
5) the pineal
6) the anterior medullary velum. This membrane forms the roof of the anterior part of the fourth ventricle.
7) the superior and inferior colliculi
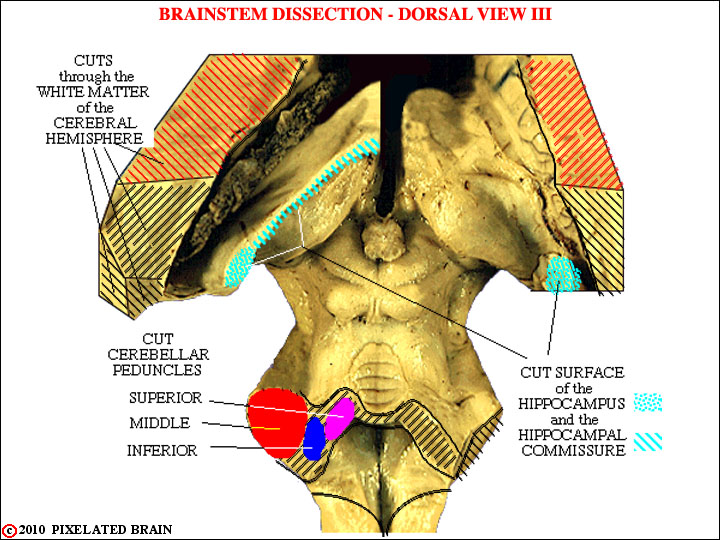
FIGURE 2-10
This dissection is similar to that of Figure 2-9, but photographed at a slightly different angle. It shows the cut cerebellar peduncles and the midbrain more clearly, but gives a more oblique view of the diencephalon. In this instance part of the fornix and related structures (the hippocampus and hippocampal commissure - don't worry about them, for now) were left in place on the left side, partially obscuring the dorsal surface of the diencephalon.
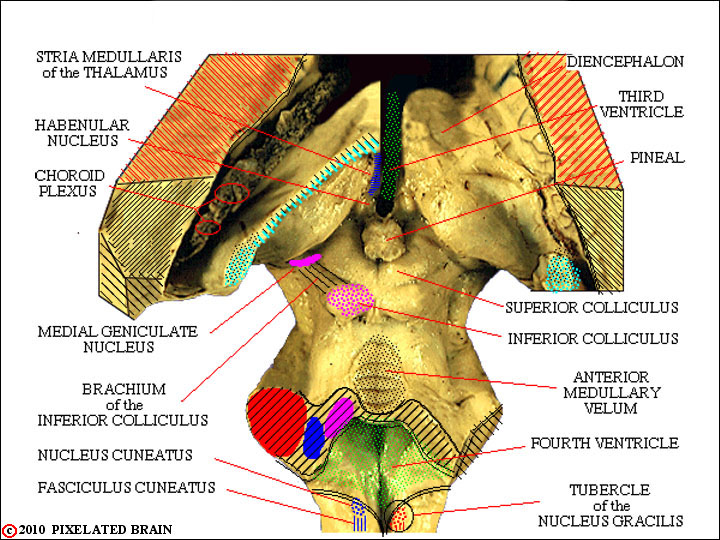
FIGURE 2-11
This view identifies a variety of structures. Features you should note include:
1) the choroid plexus. You should realize that our dissection has exposed much of the lateral ventricle, as well as the dorsal surface of the brainstem . The choroid plexus remained behind, when the hemisphere was removed, and can be seen passing around into the inferior horn of the ventricle, just as shown in Figure 2-9.
2) the diencephalon. The more caudal part of the diencephalon tends to "overhang" the midbrain and may obscure it from view . In Figure 2-5, this part of the diencephalon has been shown on the right but "removed" on the left to reveal underlying structures.
3) the brachium of the inferior colliculus. One of the many bundles of fibers which happen to run on the surface of the brainstem and therefore create an identifiable surface landmark. Brachium is one of several names used for structures of this sort. You may want to look at Figure 2-12 for more examples of terms we will begin to use.
4) the superior, middle and inferior cerebellar peduncles. Here we see the cut surface of the peduncles. They are, in a sense, embedded in surrounding tissue, and thus their borders are not easily defined in the photograph; they are shown more precisely in Figure 2-5.
5) the fourth ventricle. It is exposed to view because the cerebellum and choroid plexus have been removed.
6) the nucleus cuneatus, fasciculus cuneatus and tubercle of the nucleus gracilis. These structures lie at the most caudal level of the brainstem, where the medulla becomes continuous with the spinal cord. The tubercle is simply the surface bump, created by the underlying nucleus.
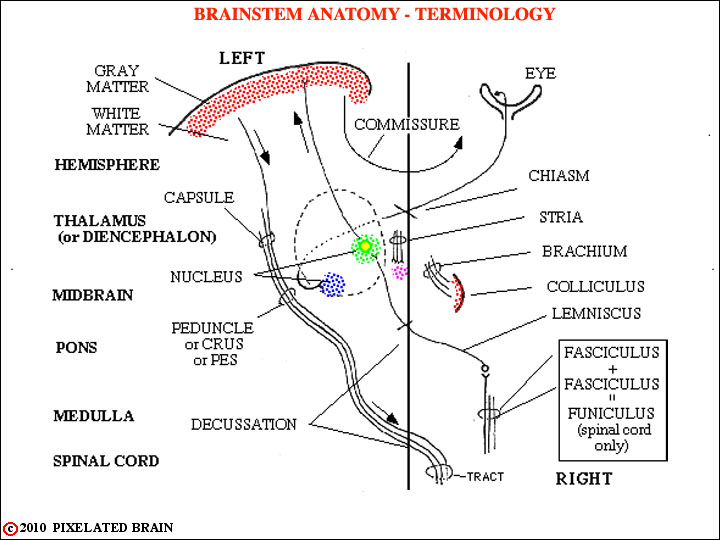
FIGURE 2-12
This is a highly schematic "phantom" view of the brain, and we are looking down from above. The brain levels are shown on the left. All the brain has been scooped out, leaving behind only a few choice structures. If you can't visualize the anatomy, don't worry about it. The aim is just to introduce you to a variety of terms we will use as the module progresses.
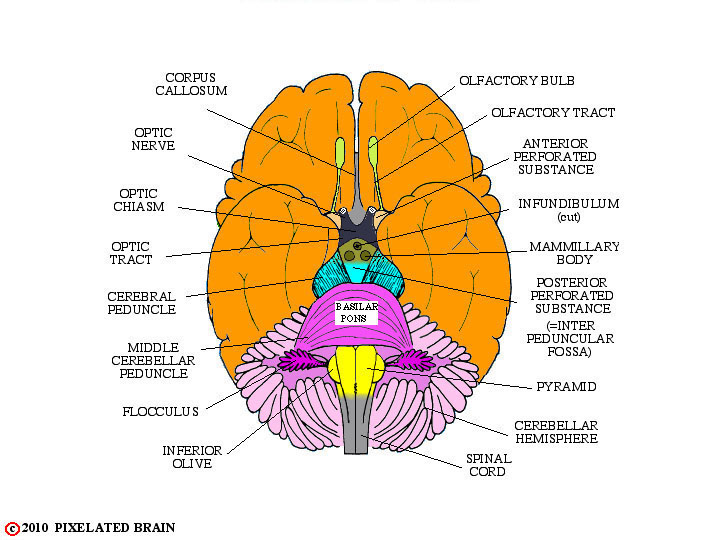
FIGURE 2-13
Here, as elsewhere in this module, we include the diencephalon in our discussion of brainstem anatomy, even though - strictly speaking - it is not part of the brainstem. Also, we may at times refer to the diencephalon as the thalamus, even though this is not quite right either. While unfortunate, this is the way people use these words. Take another look at Figure 2-2 if this is confusing.
In some respects, the anatomy of the ventral brainstem is relatively simple. This view shows the major landmarks that you should be able to identify. In line with the above, we have also included a few structures that are part of the diencephalon (mammillary body, etc.) and hemisphere (corpus callosum, etc)
The problem is that this is also the logical time to identify the cranial nerves. We don't want to get into the details, because we take the nerves up later in the course, but (for this module) you should be able to pick out each nerve and relate its point of exit from the brainstem to surrounding structures. The next slide gives you all you need to know for now.
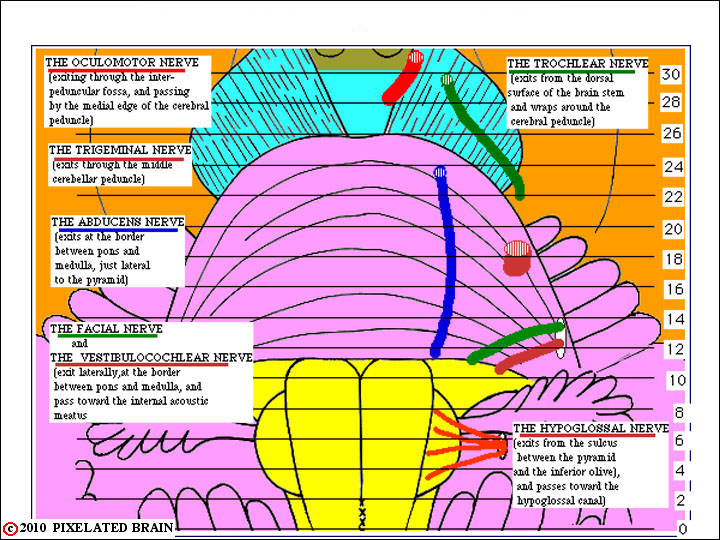
FIGURE 2-14
While we are not going to deal with the details of the cranial nerves in this module (they come in modules 8 and 9) you ought to be able to identify now and relate them to nearby structures. This view tells you all you need to know for now.
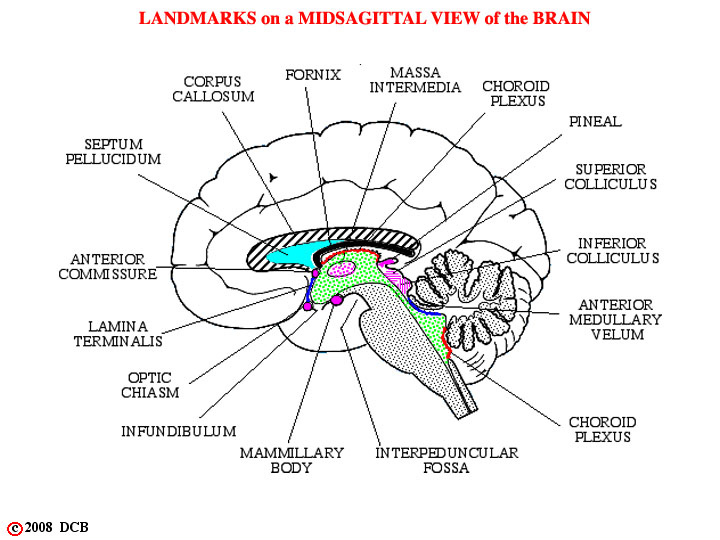
FIGURE 2-15
To help you integrate your "vision" of brainstem anatony, sagittal views will be helpful. Here is one of them. Compare it with Figure 1-39 .
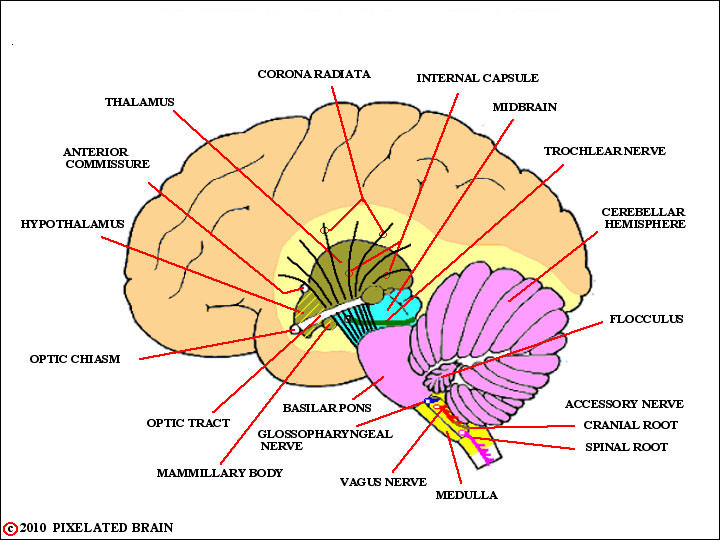
FIGURE 2-16
We are, in a sense, at the midpoint of the module. We have looked 7 dorsal views of the brainstem, 2 ventral views and 2 sagittal ones. In the process, we have identified more than 50 structures. To review the situation look at the module 2 glossary. We don't expect you to know anything about the function of these structures, but we do hope you will be able to identify most of them on the appropriate figure, once you finish studying this module. The best way to get to the glossary is to click on "I Want To" , which you will find somewhere in most views (including this one) . In that view, find the "X" for the module 2 glossary and click on it.
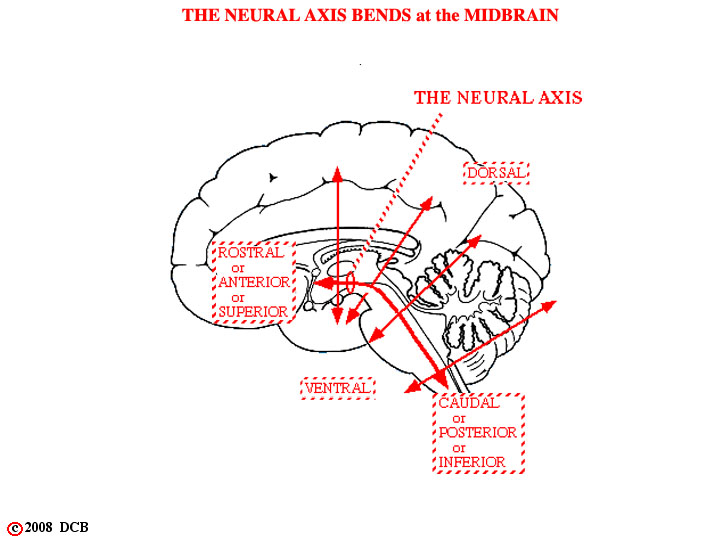
FIGURE 2-17
The neural axis may be pictured as a line which runs along the length of the neural tube and it is indicated by a red line this view. Directional terms use this axis as a reference and are summarized on this view. In general, these words have meanings which are already familiar to you from Gross Anatomy, but there is one exception. In describing the brain, the terms anterior and posterior are the equivalent of rostral and caudal (whereas in the body they are synonymous with ventral and dorsal).
The neural axis is a relatively straight line in four-legged creatures, but in humans it has a definite bend , with most of the bending taking place at the level of the midbrain . This is even more apparent when one looks at views of the developing brain. This bending of the neural axis creates one minor problem and one major one.
1) The direction, specified by such terms as ventral and dorsal, changes in an absolute sense, as one passes from one division of the brain to another. Clearly, the ventral-dorsal plane of the medulla in man is not parallel to the ventral-dorsal plane of the diencephalon. This is a bit odd, but causes no real difficulty.
2) In serial sections of the brain, such as the ones we will be using, it is impossible to alter the angle of section as the microtome knife advances from one region of the brain to the next. If a brain is cut in such a way as to obtain true cross sections (plane perpendicular to the neural axis) through the medulla, then the sections through the diencephalon will be almost horizontal (plane parallel to the neural axis). The sections between these limits will pass through the brain at an oblique angle and be extremely difficult to interpret. This does create a problem and the various published atlases of the brain all try to deal with it--most of them doing so in a rather unsatisfactory manner. The plane of section for slides that we will be using, almost exclusively, in studying the brainstem is shown in the next view.
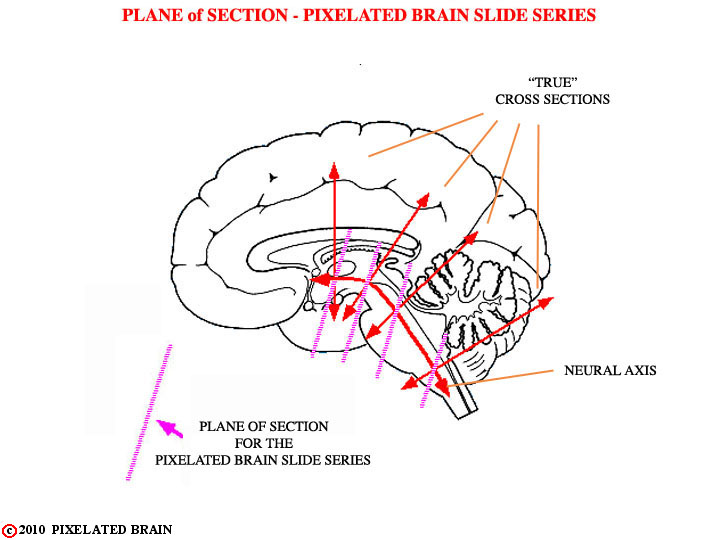
FIGURE 2-18
As you can see, the angle of cut used in making our slides is a compromise, but the plane of section is reasonably close to a true cross-section for most of the brainstem.
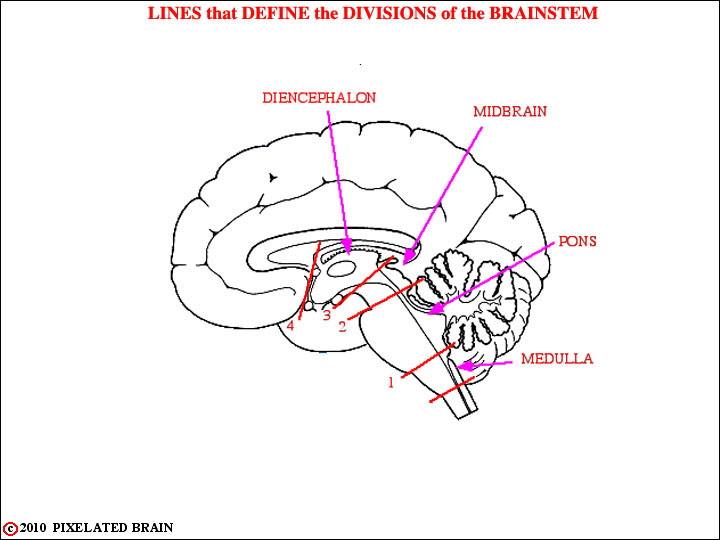
FIGURE 2-19
You are now ready to put your knowledge of surface anatomy to use in identifying the level of cross sections through the brainstem. The lines in this view serve to define the borders between divisions of the brainstem.
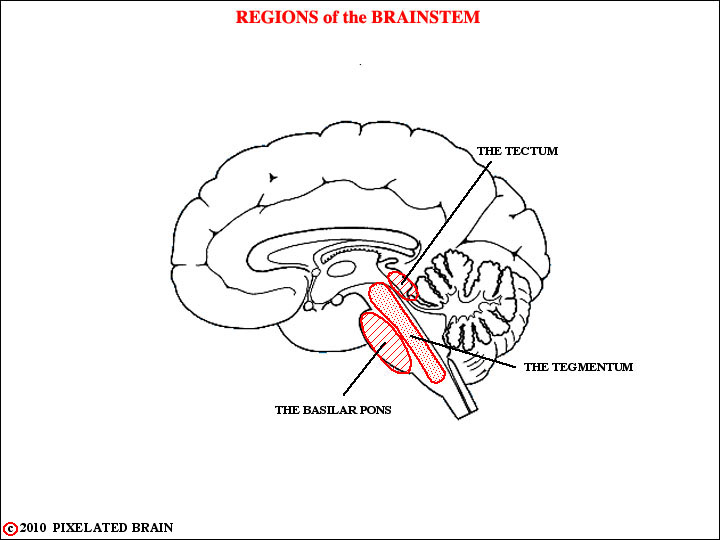
FIGURE 2-20
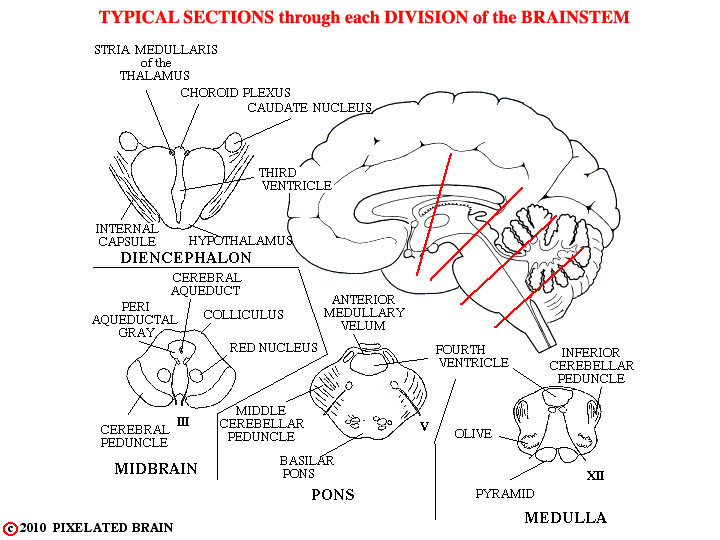
FIGURE 2-21
In this figure the 4 lines drawn on the mid-sagittal view show the plane of cut for the sections in the figure. In each section, a few of the landmarks that help to identify the level of the section are given. For example, the presence of the colliculi, the cerebral aqueduct and the cerebral peduncle in the section shown in the lower left part of the figure tell you that this section HAS TO BE through the midbrain. However, because the slides in the Cu slide series cut through most of the brainstem at an oblique angle, we will rarely sections that look exactly like these "typical" ones.
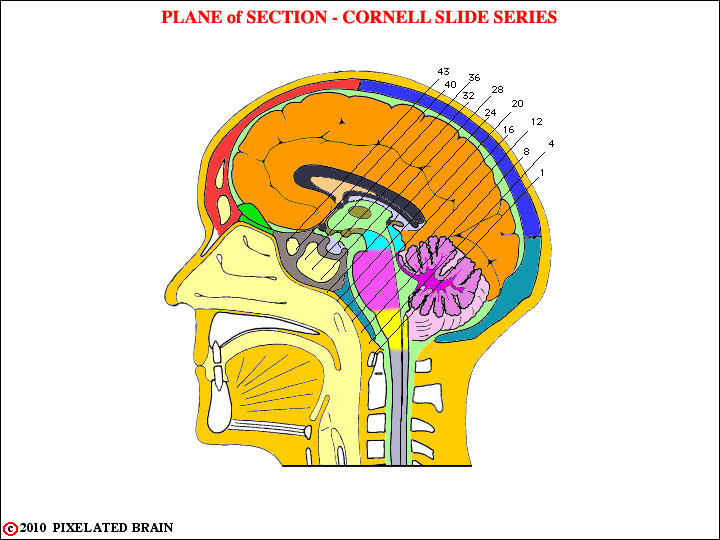
FIGURE 2-22
This shows, in some detail. the plane of section of the slides we will be working with for the rest of the course.
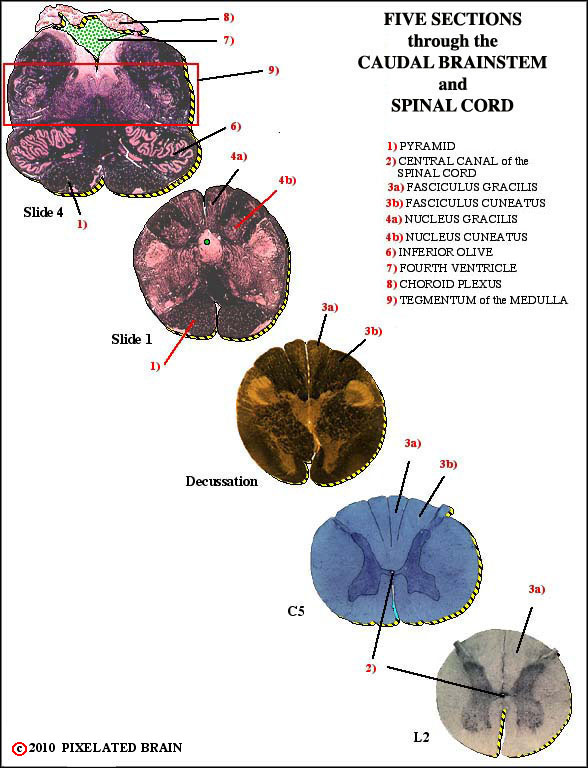
FIGURE 2-23
Most of the structures labeled on these slides are ones you have identified in earier views of this module. Try to reconcile the appearance of the structure here with that in views of the brain's surface. All the sections, except the 3 spinal cord ones, are clickable. Clicking on one leads you to enlarged view of the section.
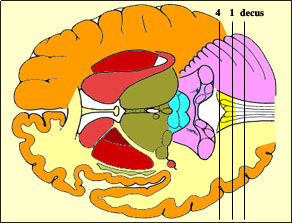
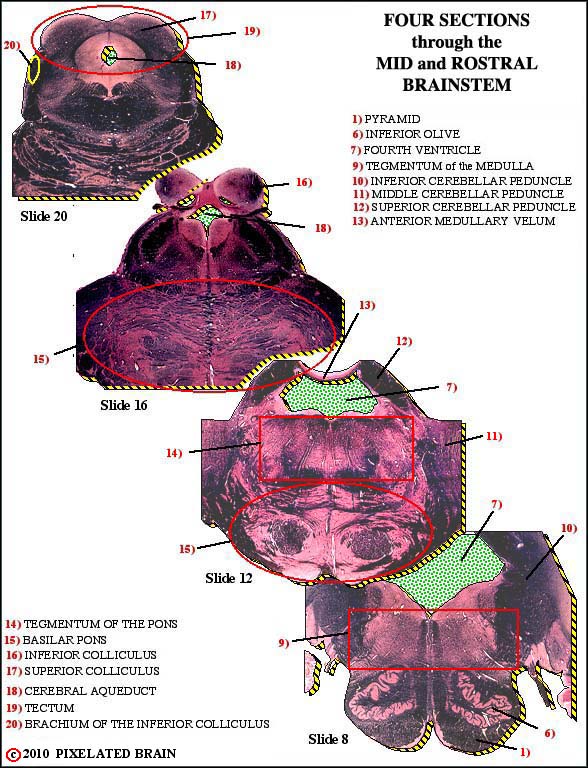
FIGURE 2-24
Most of the structures labeled on these slides are ones you have identified in earier views of this module. Try to reconcile the appearance of the structure here with that in views of the brain's surface. All the sections, except the 3 spinal cord ones, are clickable. Clicking on one leads you to enlarged view of the section, with much more detail.
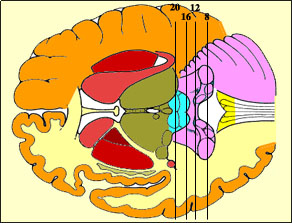
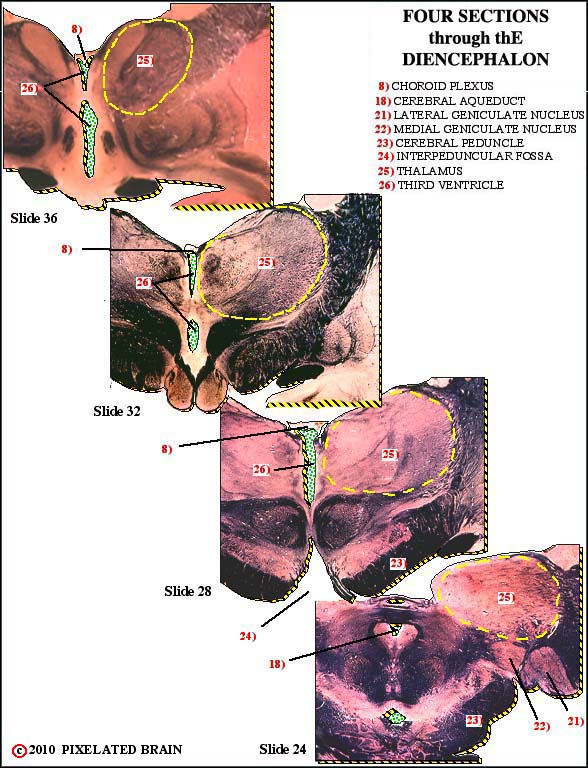
FIGURE 2-25
Most of the structures labeled on these slides are ones you have identified in earier views of this module. Try to reconcile the appearance of the structure here with that in views of the brain's surface. Clicking on one leads you to an enlarged view of the section, with much more detail.
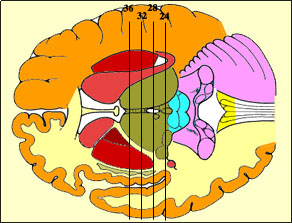
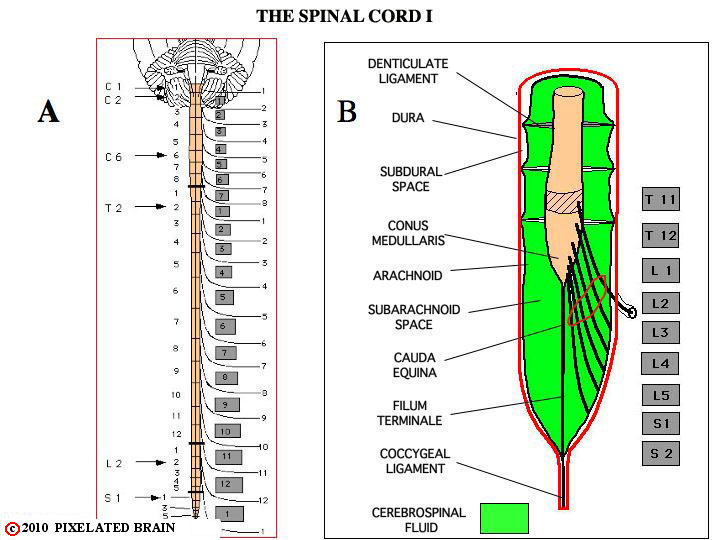
FIGURE 2-26
This view tries to make 3 point:
1) It shows the relative size of the brain and spinal cord
2) It demonstrates the relationship between spinal cord segments and vertebrae
3) It also illustrates the relationship between the meninges, the subarachnoid space and the exiting nerves in the lumbar region
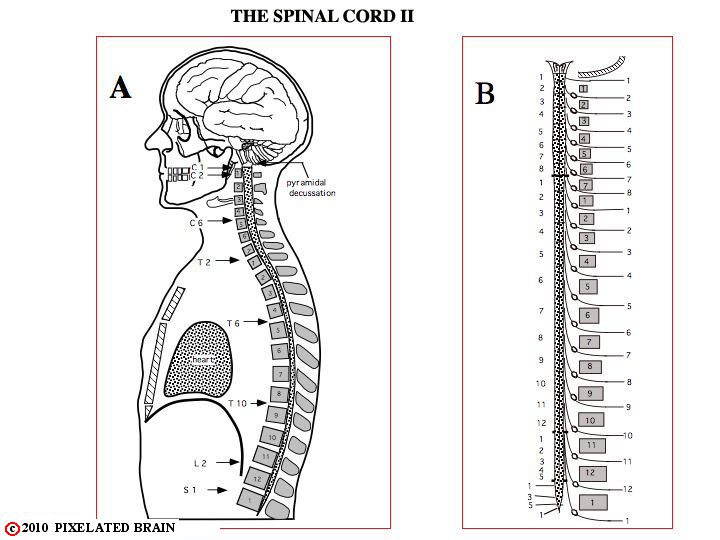
FIGURE 2-27
This lateral view makes some of the same points as the previous view, and relates the spinal cord to soft tissues of the thorax and the abdominal cavity.
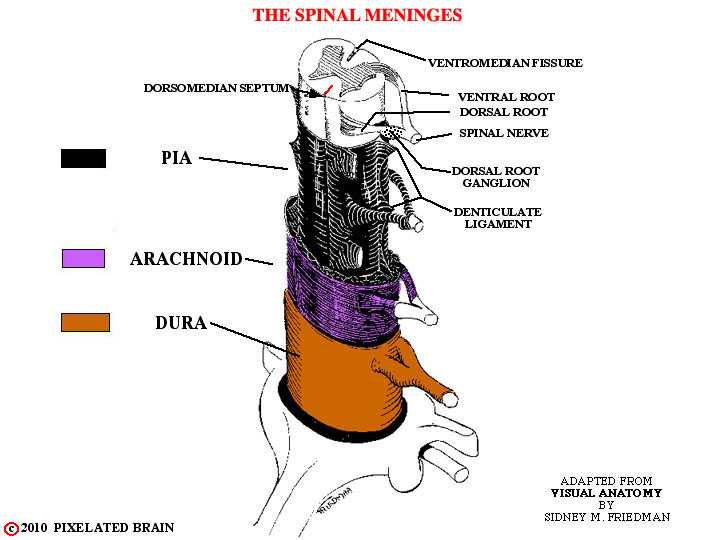
FIGURE 2-28
This view shows the relationship between the meninges, the subarachnoid space, the spinal cord and exiting spinal nerves.
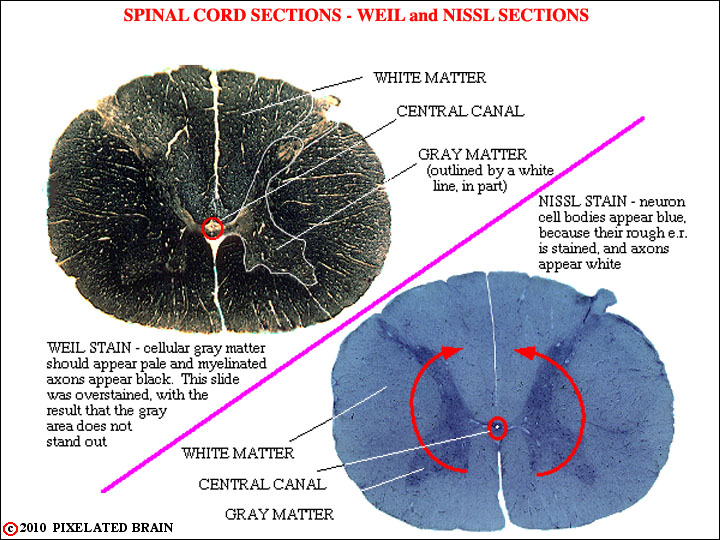
FIGURE 2-29
The remaining views of this section deal with the histological appearance of the spinal cord. This first view shows the general appearance of the spinal cord. The red arrows are there to remind you that it was the folding of the neural plate that gave rise to the neural tube, of which the spinal cord is a part. The cavity within the tube is quite small at spinal cord levels (the central canal), but greatly expands within some parts of the brain, as you already have discovered. At any level, the cord may be divided into a central, butterfly-shaped region - the gray matter - which contains many cells, and a peripheral zone of white matter, consisting mainly of myelinated and unmyelinated axons.
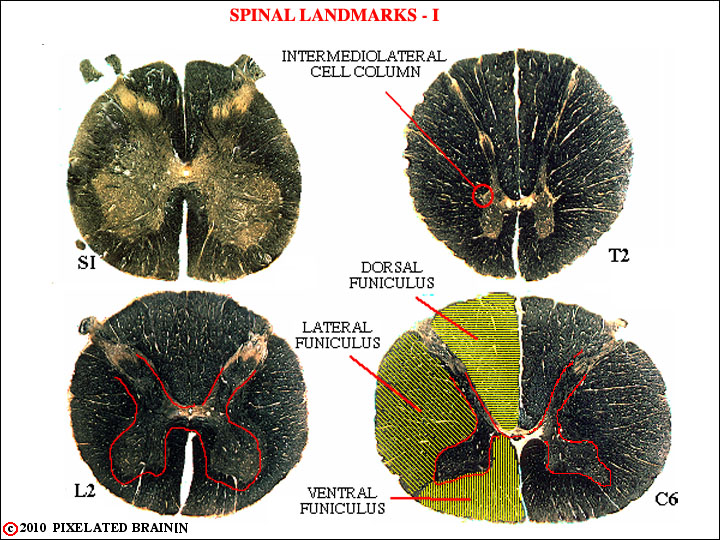
FIGURE 2-30
This view shows several features of spinal cord anatomy that are helpful in placing the level of any given section.
1) The gray matter enlarges at the level of the lumbosacral plexus (S1 - L2) and at the level of the brachial plexus (C5-C8)). It is relatively sparse at thoracic levels.
2) White matter occupies an increasing fraction of the total area as the cord approaches the brainstem.
3) The intermediolateral cell column is present only from T1 to L2 or L3.
The pathways which connect the spinal cord with the brain ascend and descend within the white matter. This peripheral region is divided by the dorsal and ventral horns of gray matter into three funiculi - the dorsal funiculus, the lateral funiculus and the ventral funiculus. At upper thoracic and all cervical levels the dorsal funiculus is further subdivided, as shown in the next view Figure 2-31.
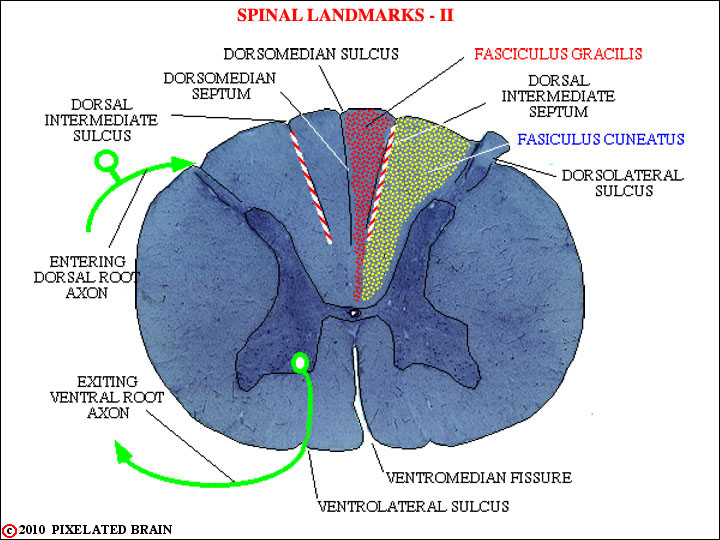
FIGURE 2-31
At upper thoracic and all cervical levels the dorsal funiculus is further subdivided, as shown here This view also shows the named sulci, fissures and septi, as well as the course taken by entering and departing axons
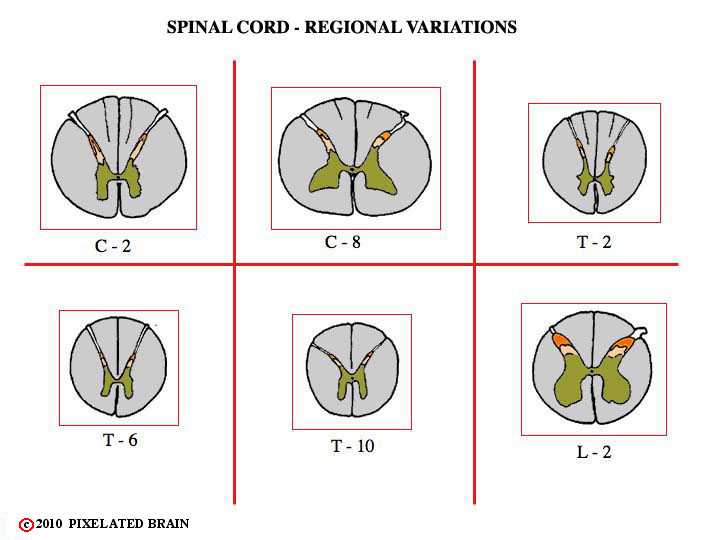
FIGURE 2-32
Like Figure 2-30 this one shows several features of spinal cord anatomy that are helpful in placing the level of any given section.
1) The gray matter enlarges at the level of the lumbosacral plexus (S1 - L2) and at the level of the brachial plexus (C5-C8)). It is relatively sparse at thoracic levels.
2) White matter occupies an increasing fraction of the total area as the cord approaches the brainstem.
3) The intermediolateral cell column is present only from T1 to L2 or L3.
The pathways which connect the spinal cord with the brain ascend and descend within the white matter. This peripheral region is divided by the dorsal and ventral horns of gray matter into three funiculi - the dorsal funiculus, the lateral funiculus and the ventral funiculus. At upper thoracic and all cervical levels the dorsal funiculus is further subdivided, as shown in Figure 2-31.
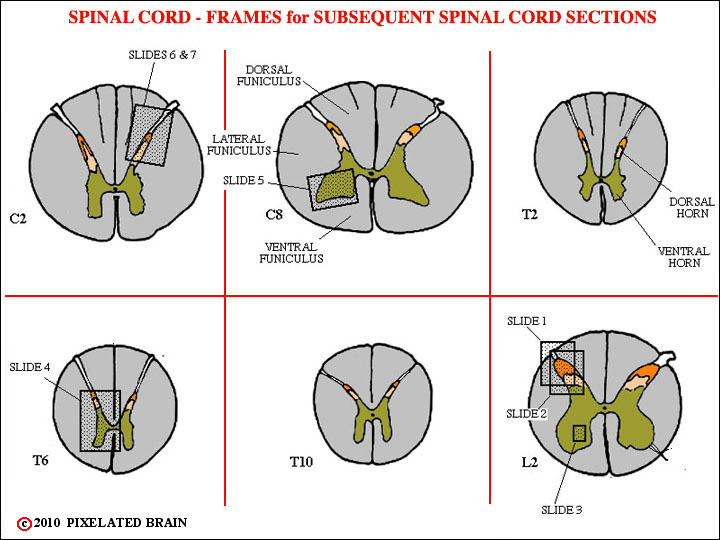
FIGURE 2-33
The "boxes" in this view define the areas covered in the views that follow.
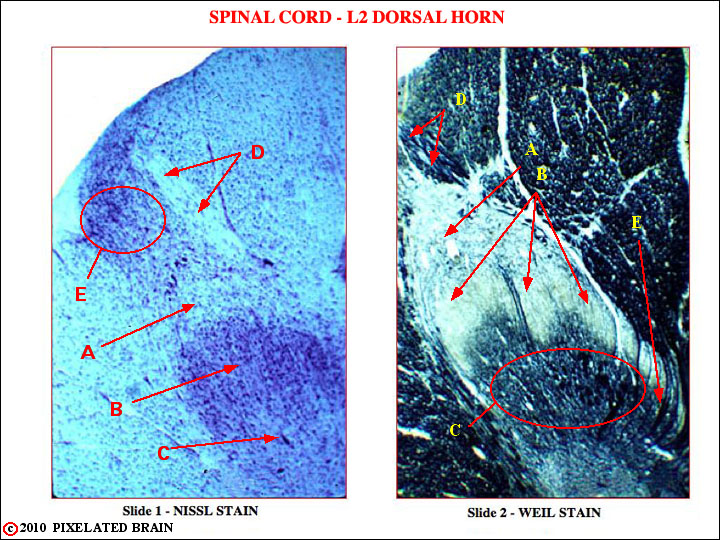
FIGURE 2-34
Slide 1 - L2, dorsal horn. Nissl stain. Cell bodies appear pink (because their rough e. r. is stained) and axons ("white matter") appear white. See Fig. 33 for orientation of section.
A. Posterior marginal nucleus (lamina I)
B. Substantia gelatinosa (laminae II)
C. Nucleus proprius (laminae III, IV)
D. Myelinated dorsal root fibers on their way to terminate in deeper spinal cord lam
E. Dorsolateral fasciculus (of Lissauer). Unmyelinated dorsal root fibers enter in this more lateral position and may run up or down the cord for a few segments before turning medially to terminate in laminae I, II, III.
Slide 2 - L2 dorsal horn. Weil stain. Cellular gray matter appears pale, while myelinated axons stain black. Almost same level as previous slide.
A. Posterior marginal nucleus (lamina I).
B. Substantia gelatinosa (laminae II)
C. Nucleus proprius (laminae III, IV)
D. Myelinated dorsal root fibers on their way to terminate in deeper spinal cord laminae
E. Note myelinated dorsal root axons turning laterally to terminate directly in the deeper lamine.
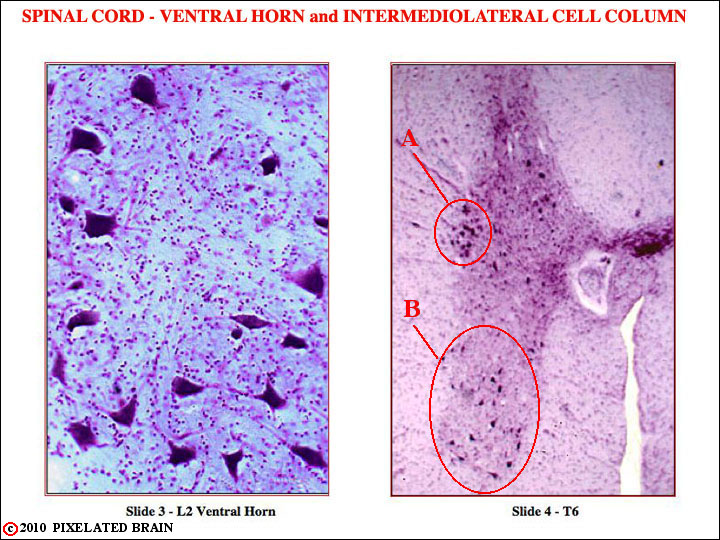
FIGURE 2-35
Slide 3 - L2 ventral horn, higher magnification. Nissl stain. Note the large cell bodies of motor neurons in what must be lamina IX. See Fig. 33 for orientation of section.
Slide 4. T6. low magnification, Nissl stain. See Fig. 33 for orientation of section.
A. Intermediolateral cell column. The cell bodies we see are those of sympathetic preganglionic neurons.
B. Motor neuron nuclei in ventral horn. Note that at this thoracic level, where the motor innervation is of trunk muscles only (no extremity), the anterior horn is rather narrow. Compare with the anterior horn at the level of C6, shown in Fig. 2-37.
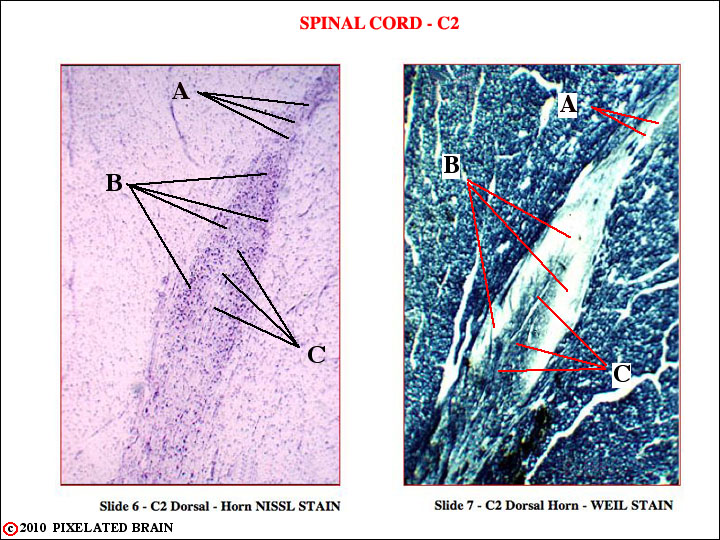
FIGURE 2-36
Slide 6 - C2 dorsal horn, Nissl stain. See Fig. 33 for orientation of sections.
A. Posterior marginal nucleus (lamina I).
B . Substantia gelatinosa (laminae II)
C. Nucleus proprius
Slide 7 - C2 dorsal horn, Weil stain
A. Posterior marginal nucleus (lamina I).
B. Substantia gelatinosa (laminae II).
C. Nucleus proprius.
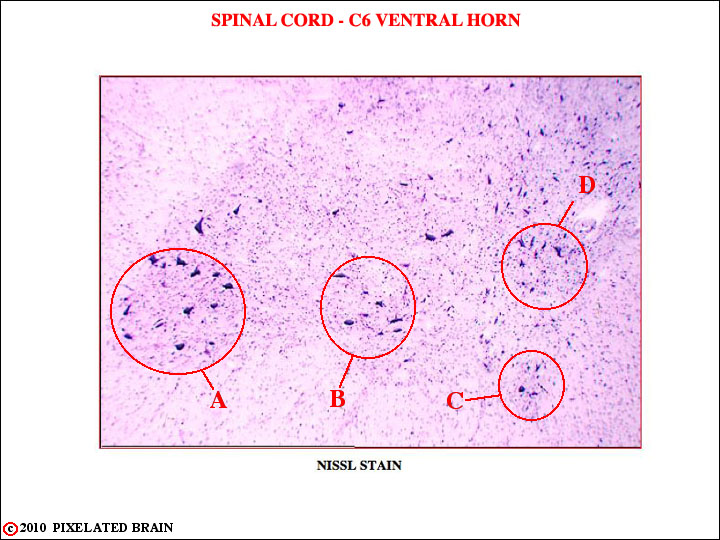
FIGURE 2-37
Slide 5. C6 ventral horn. Nissl stain. See Fig. 33 for orientation of section.
Note the prominent lateral extension of the ventral horn. Letters A-D point to the individual motor nuclei of lamina IX, each of which provides innervation to a single muscle or a group of muscles having a similar action. Distal muscles (i.e., those of the hand) tend to be innervated by the more lateral nuclei, such as A. Proximal muscles (like the deltoid) are innervated by the most medial nuclei, such as C and D.
This type of organization, in which the body is represented spatially within the nervous system in a reliable and orderly fashion is called a somatotopic one. Somatotopy is conceptually similar to the organization in other sensory systems (retinotopy for the visual system and tonotopy for the auditory system).
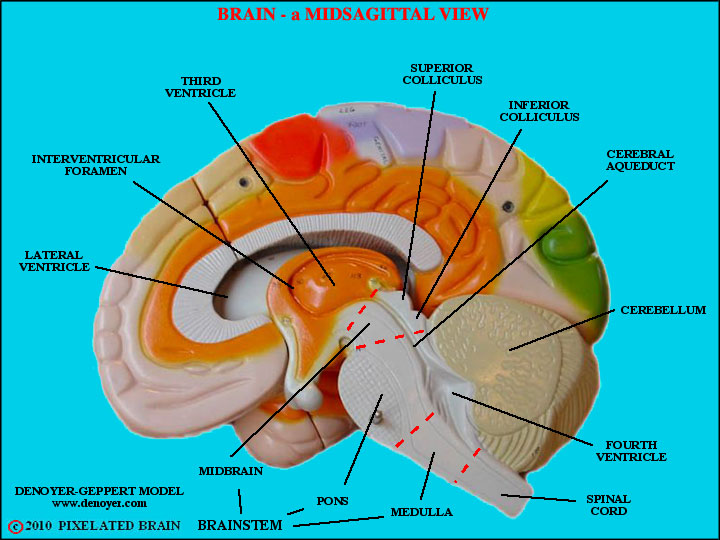
FIGURE 2-38
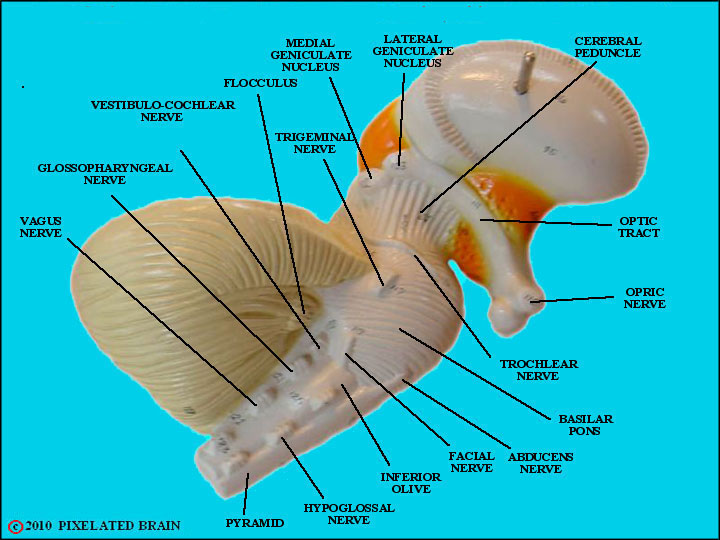
FIGURE 2-39
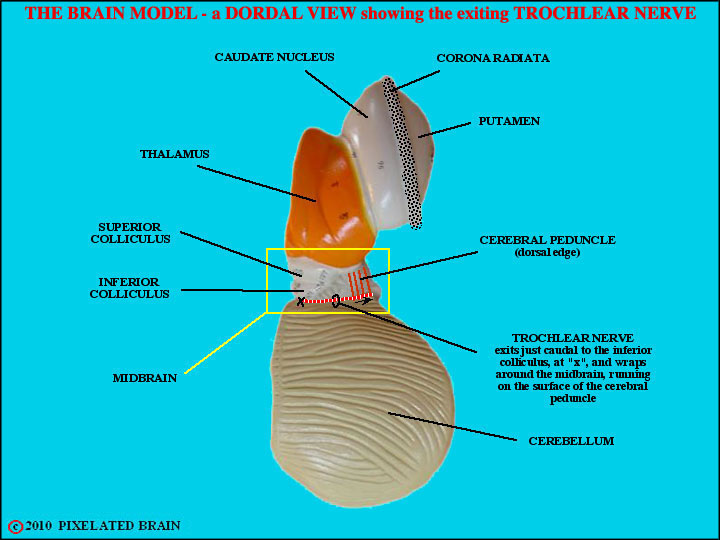
FIGURE 2-40
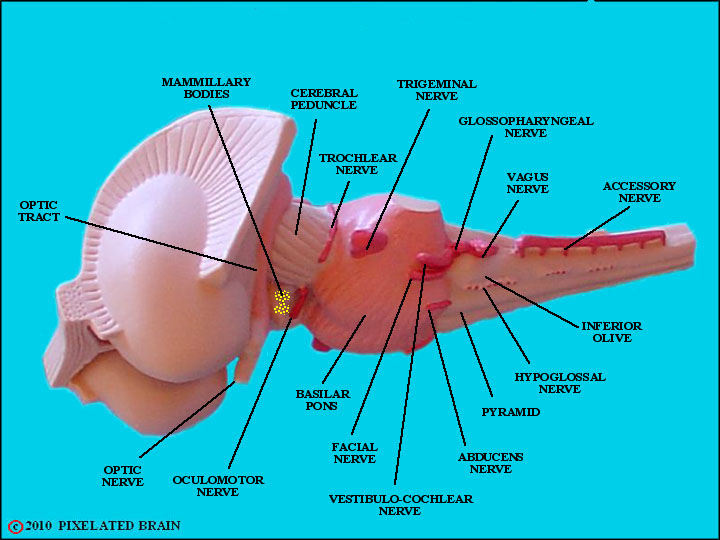
FIGURE 2-41
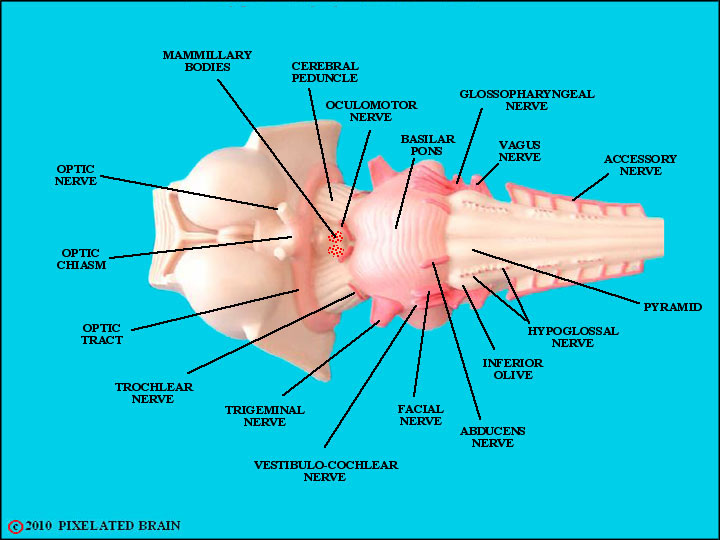
FIGURE 2-42
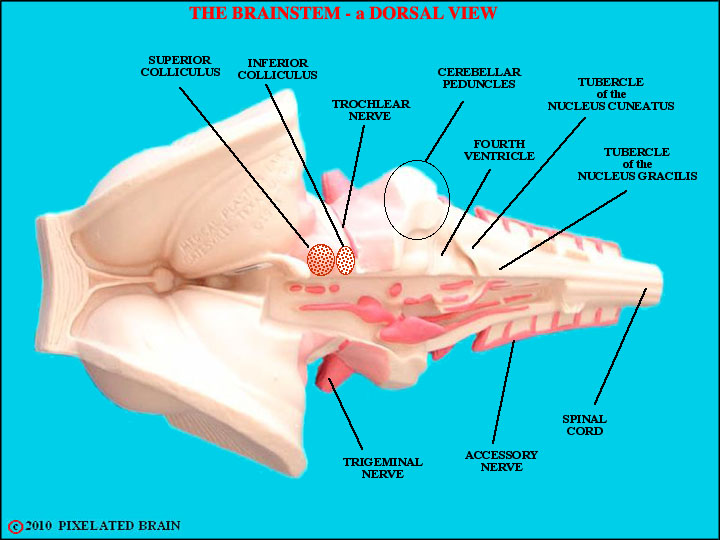
FIGURE 2-43
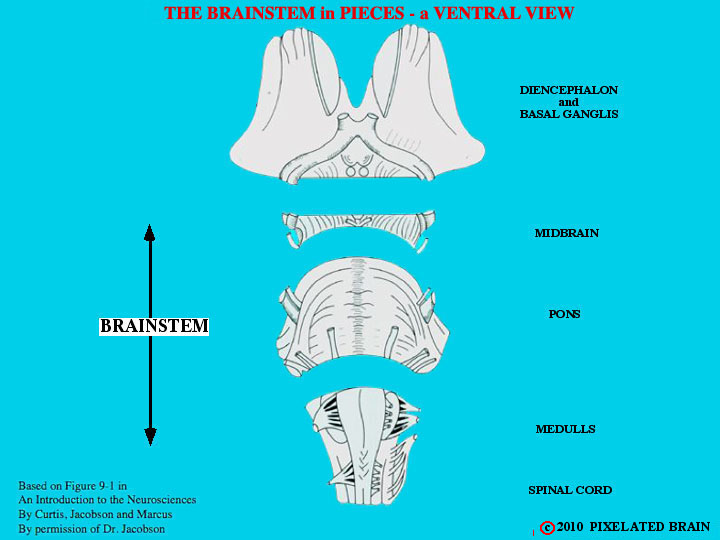
FIGURE 2-44
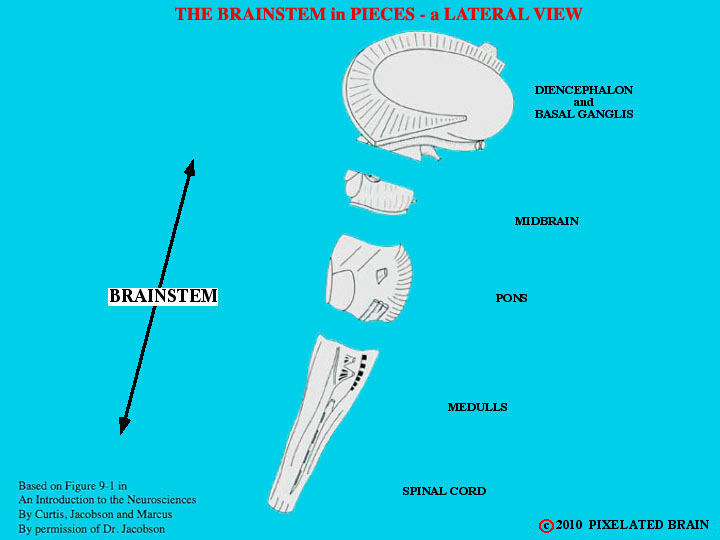
FIGURE 2-45
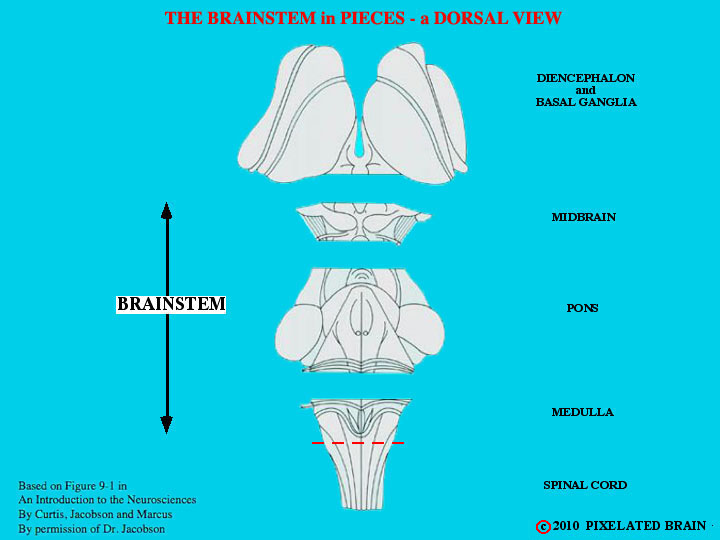
FIGURE 2-46
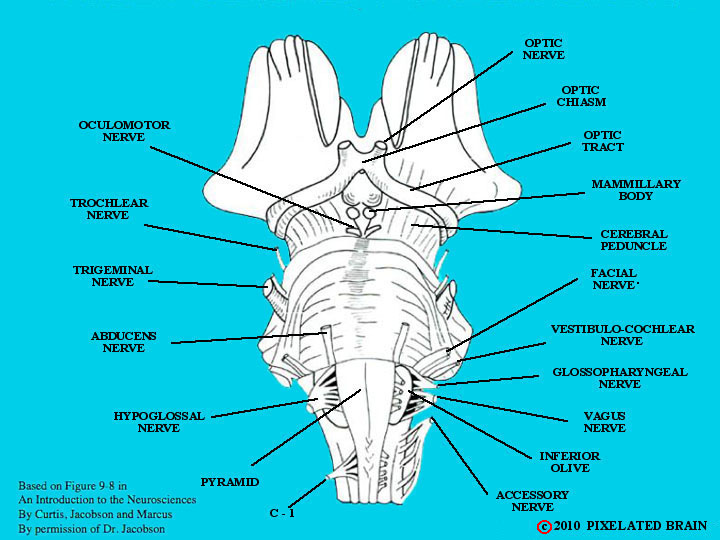
FIGURE 2-47